Cubism for Computer Graphics
The Main Idea
Suppose you could take a camera — lens, film, and all — and stretch it like a blob of Silly Putty. You could wrap it around people, simultaneously capturing them from multiple directions. You could put one end of the blob on the ground floor of a building and stretch the other end up the stairs to the roof, getting one exposure of the whole stairway all at once. You could change the shape of the camera for every image in a movie, following multiple characters at the same time as they move around.
The storytelling possibilities for such cameras are exciting. They could let us express novel visual relationships among characters and elements of the scene and how they affect one another.
 It would be nearly impossible to create these cameras in real life, but they’re entirely possible in computer graphics. Most of the computer graphics made so far has been rendered with cameras that are modeled on their real, physical counterparts. But when we free ourselves of this physical model, we find that there’s a whole new exciting grammar of visual storytelling to be explored.
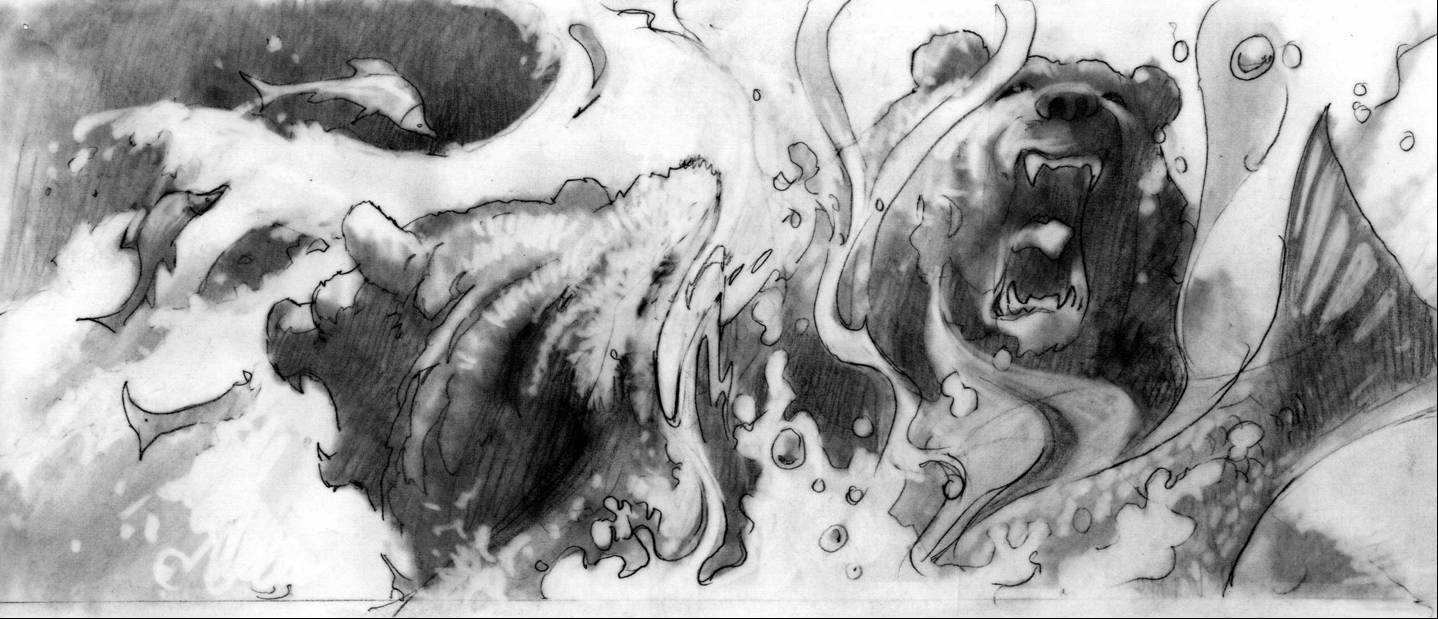
Suppose we’re making a nature documentary, and our shot list calls for a bear grabbing a fast-moving salmon out of a river. We could show the scene simultaneously from the point of view of both the bear and the fish, letting us see this carefully-choreographed action as both animals see it.
These beautiful illustrations were all drawn by Tom McClure using pencil on vellum.
 Note that this is not a classic split-screen effect, where we show two separate pieces of film or video side-by-side. Instead, the view is smooth, continuous, and fluid. As the animals move and the various pieces of our extended camera move with them, the region that connects the two different sets of imagery can change location, shape, and adapt in any way we want.
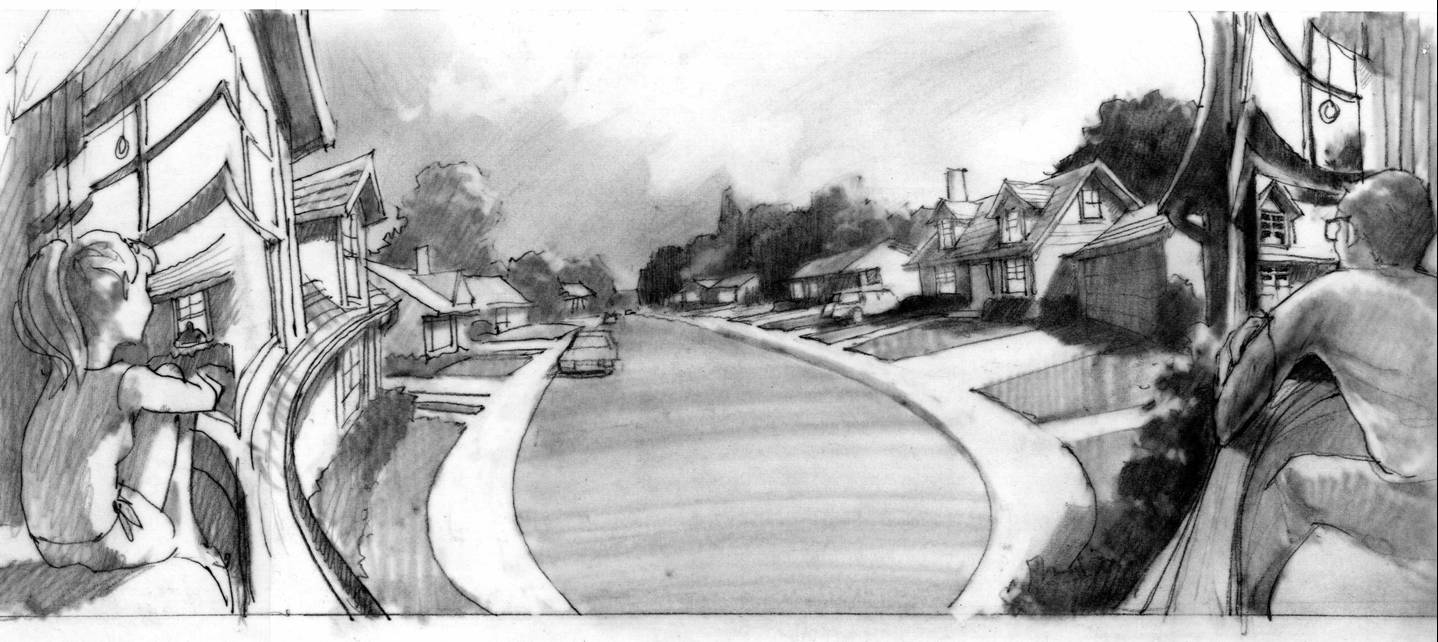
In a more traditional dramatic setting, imagine two young lovers who live across the street from one another, both grounded and forbidden from any contact. In one shot we can see both characters, and the wide gulf of the street that separates them. When a new character arrives on the scene, bicycling down the street, we can see how all three of them react at one time.
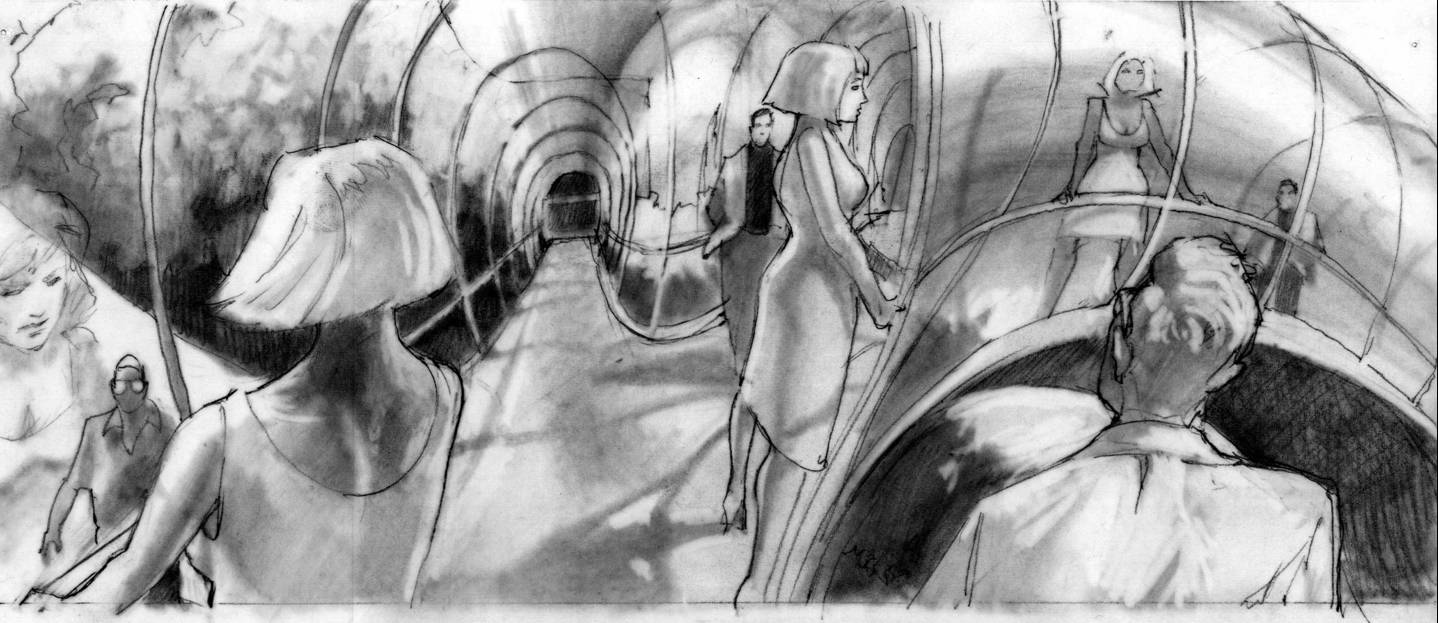 As a third example, imagine a thriller, where an important scene occurs in a glass walkway, or tube, that connects two buildings. In this scene, the girl in the tube is waiting to hand off some secret information to a contact she’s never met before. She thinks it could be the man on the ground who’s watching her, and she’s waiting for him to give her a signal. Meanwhile, the man in the dark shirt who’s approaching her is carrying a small syringe of poison, which he plans to casually inject into her as he walks by. The woman has taken no notice of the dark-shirted man, but the man on the ground has just figured out what’s going on and is trying to figure out how to warn her.
This novel way of viewing the scene lets us catch a lot of information at once. We get to see the point of view of all three different characters at once (the woman appears four times, once in a reflection). We get to easily judge where everyone is with respect to each other. To heighten the tension, the dark-shirted man is approaching us in one part of the frame, while we can also clearly see how near he’s gotten to the woman.
 One way to turn this into reality is to design free-form cameras that fit right into our scenes. Then using standard computer graphics techniques, we simply render the images seen by these cameras.
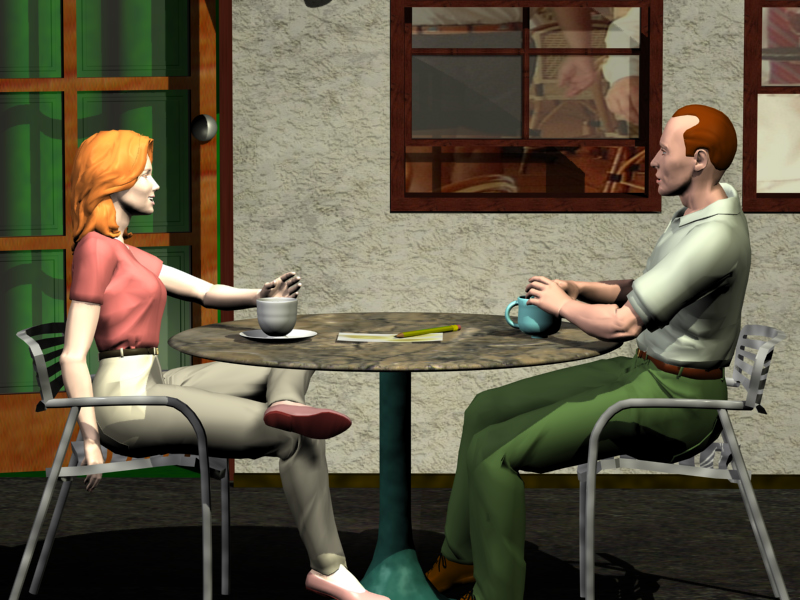
To see this in action, consider this cafe scene. The man and woman are facing one another and having an intimate conversation. We’d like to show them both from the front, facing the camera.
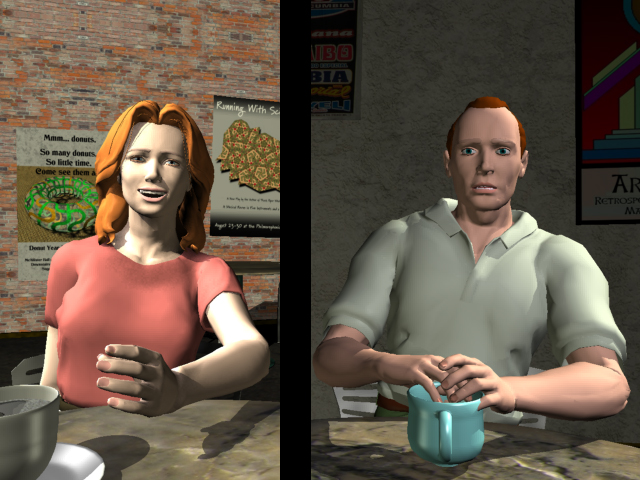 We can do this with a traditional split-screen. We need only shoot the scene twice, first with the camera in front of one character and then moving it to the other. Then we can show both rendered sequences side-by-side.
This can certainly do the job, but there’s no sense of spatial connectivity. The man and woman could be in different coffeeshops, or even different cities, for all we know. There’s nothing in the split-screen view that ties them together.
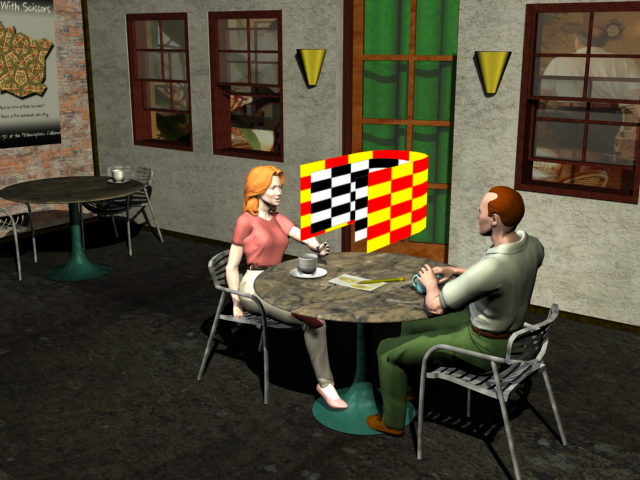 So let’s place a free-form camera that does the job we want. In this image, there are two sets of curved checkerboard shapes. The inner shape, in black and white, represents the film or emulsion of the camera. The outer checkerboard, in yellow and red, represents the direction of the incident light that is recorded at each point by the emulsion.
It’s easiest to think of this in ray-tracing terms. To create a ray, we pick a pair of (u,v) coordinates. The corresponding point on the black-and-white checkerboard is the starting point of the ray, and the point on the red-and-yellow checkerboard is a point that ray passes through. Once we’ve created our rays, we can use any kind of ray-tracer to render the image. Of course, these two checkerboards are devices for controlling our camera model, and wouldn’t be included as part of the rendered image.
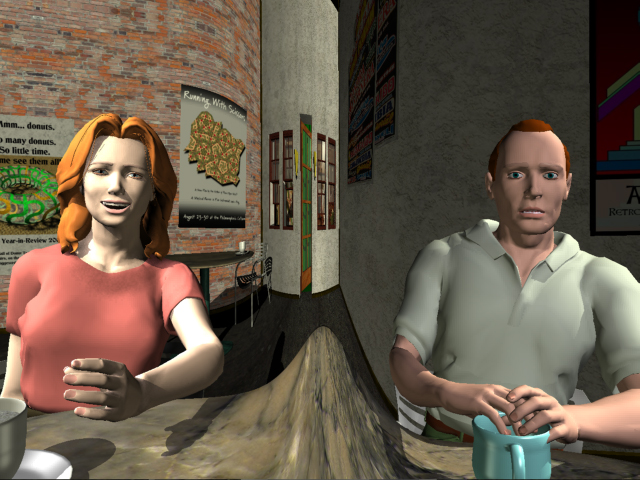 The result I rendered from this free-form camera is like the split-screen, but it has spatial continuity, locking down the two characters as belonging to the same space. The region between them is compressed horizontally, as it must be. It also appears to be compressed vertically, but that’s because the wall is farther away than the characters.
In this shot, if the two characters reach out to hold hands, we’ll naturally see that in the curved region. If their arms look distorted in an unpleasant way, we can easily re-shape the camera to maintain a good-looking image. In fact, we can even manipulate the shape of the camera over the course of the animation, perhaps to emphasize certain aspects of the scene over time.
Another way to create these kinds of cubism-inspired free-form cameras is with a collaging technique. This starts like the split-screen approach, where we render the same scene multiple times with different cameras. But in addition to saving the images these cameras produce, we save the origin and direction of every camera ray fired by each ray, and its position on the screen. We embed enough information into the image itself to allow us to recover this ray information from a larger database.
The next step is easy. To create a free-form camera for any moment in the shot, just open up all the images for that moment and read them all into your favorite image editor, such as Photoshop. Using the selection tools, pick the regions that you want to preserve and place them where you want them. This is nothing more than just selecting pieces of the image and moving them around. You do need to leave gaps between the pieces; they can’t abut or overlap.
 When you save the image, the computer reads the information encoded in the pixels and recovers the ray information for every sample. Then I carry out a multidimensional interpolation technique that smoothly blends the ray origins and directions in the gaps between the image chunks from the previous step. The result is that the image is covered with two smooth vector fields. For any point on the image, we evaluate those two fields, getting back the starting point and direction of the ray at that spot.
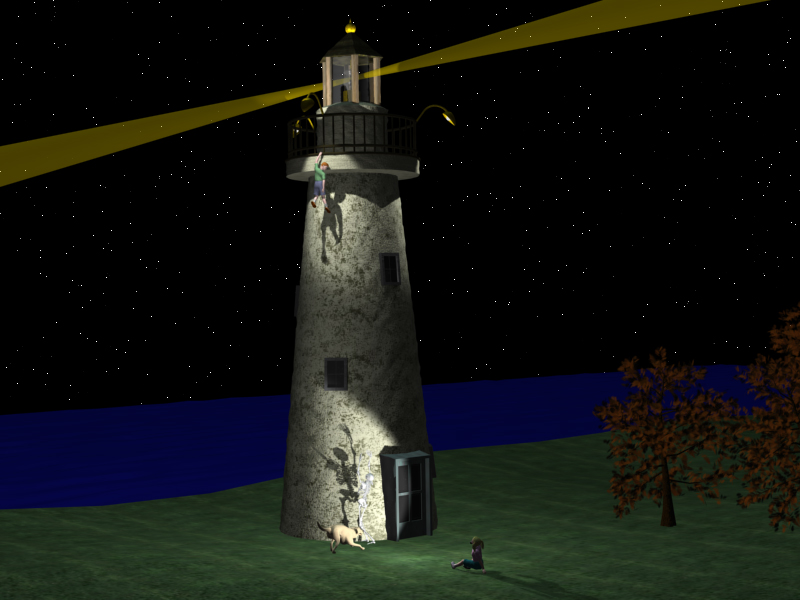
Here’s the setup for a teen monster movie. A young man is hanging from the top railing of a tall lighthouse. At the base there’s a scary skeleton trying to get him. A young girl is on the ground nearby with a twisted ankle, watching the scene as her loyal dog attacks the skeleton.
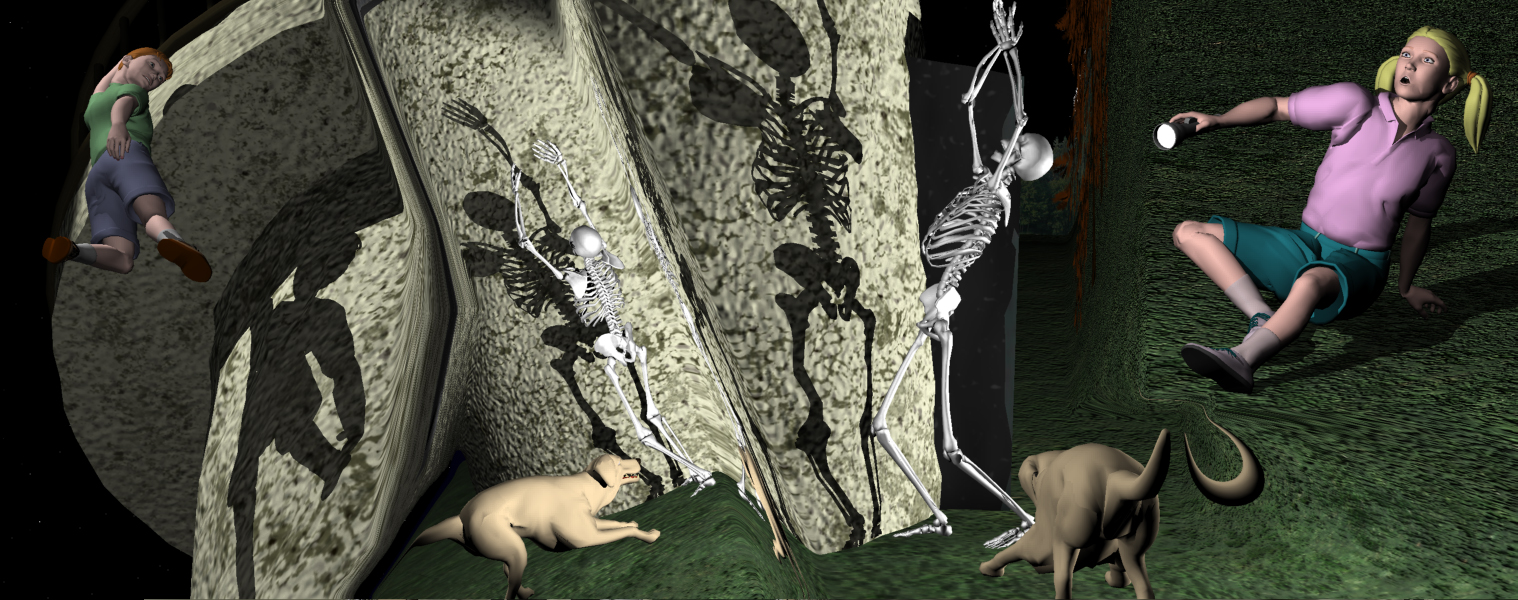 Here’s a single frame of this animation that I made with the collaging technique described above. Although everyone is separated by a lot of space, we can squish that intervening distance together while still keeping a smooth and continuous image that keeps everything locked down in the same scene. Even more exciting is that we can watch the same action from multiple points of view simultaneously. So at the right side of the frame we see the girl on the ground. Moving leftward, we see the dog attacking the skeleton from a point of view behind the dog. Then we see the very same characters, but now from the girl’s point of view so we can get a different take on the action. Finally, at the left edge of the frame we see the boy dangling from the top of the lighthouse, watching the scene below.
The free-form camera knits together all of these views into a single, continuous image. For this scene I made several different collages at different points in time, and I gave the computer interpolation curves for when and how to move from one camera model to the next. The result is that over time we get to follow the action, see it from multiple points of view, and direct the viewer’s eye to important elements all at the same time.
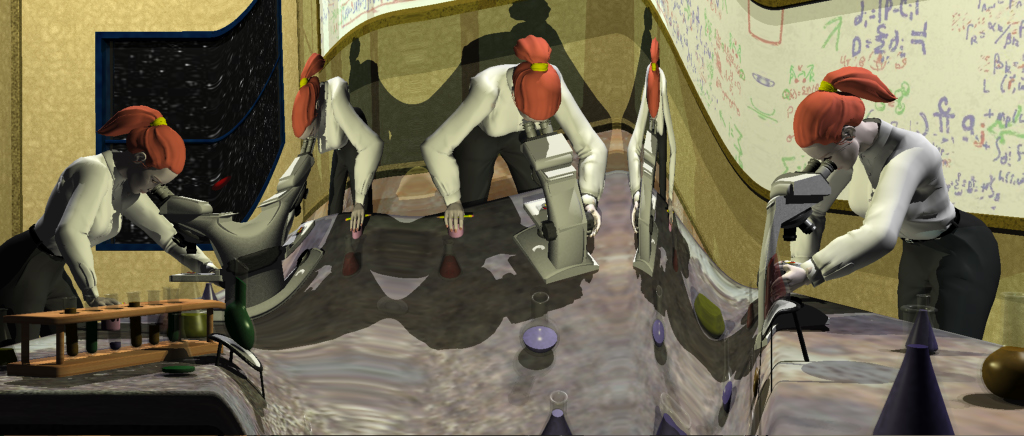 Here’s another example of a free-form image using the collaging technique. I shot the scientist from three locations: both profiles and from above and in front. Once I’d selected pieces of those rendered shots and arranged them the way I liked, the computer automatically blended these regions into smooth fields of rays. Because of the geometry of the scene and the cameras, the interpolated cameras needed to cross in front of the scientist to smoothly join up the edges of the collage pieces. The result is a scene where we see the same character performing the same actions, but from five different points of view.
When a UFO appears in the window and the scientist is startled, we see all five instances of the scientist jump at once!
References
Glassner, Andrew S., “Cubism and Cameras: Free-form Optics for Computer Graphics”, Microsoft Research MSR-TR-2000-05, January 2000.
Leave a Reply
You must be logged in to post a comment.
Leave a Reply
You must be logged in to post a comment.